One of the biggest advantages of Magento 2 compared to Magento 1 is the integrated testing framework for automated testing. It makes automated testing much easier.
A simple example
An integration test can be as simple as this:app/code/IntegerNet/CategoryDisplay/Test/Integration/Controller/NewProductsCategoryTest.php
<?php

namespace IntegerNet\Categorydisplay\Test\Integration\Controller;

class NewProductsCategoryTest extends \Magento\TestFramework\TestCase\AbstractController
{
    public static function loadFixture()
    {
        include __DIR__ . '/../_files/categories.php';
        include __DIR__ . '/../_files/products.php';
    }

    /**
     * @magentoDbIsolation enabled
     * @magentoAppIsolation enabled
     * @magentoDataFixture loadFixture
     */
    public function testCategoryDisplaysCorrectProducts()
    {
        $this->dispatch('catalog/category/view/id/3');

        $this->assertContains('Simple Product 1', $this->getResponse()->getBody());
        $this->assertNotContains('Simple Product 2', $this->getResponse()->getBody());
    }
}
Belonging to that, there are two fixture files containing predefined Categories and Products:
app/code/IntegerNet/CategoryDisplay/Test/Integration/_files/categories.php:
<?php

/** @var $category \Magento\Catalog\Model\Category */
$category = \Magento\TestFramework\Helper\Bootstrap::getObjectManager()->create('Magento\Catalog\Model\Category');
$category->isObjectNew(true);
$category->setId(3)
    ->setName('Category 1')
    ->setParentId(2)
    ->setPath('1/2/3')
    ->setLevel(2)
    ->setAvailableSortBy('name')
    ->setDefaultSortBy('name')
    ->setIsActive(true)
    ->setPosition(1)
    ->setData('display_mode', 'new_products')
    ->save();
app/code/IntegerNet/CategoryDisplay/Test/Integration/_files/products.php:
<?php
$yesterday = new DateTime();
$yesterday->sub(new \DateInterval('P1D'));
$tomorrow= new DateTime();
$tomorrow->add(new \DateInterval('P1D'));

$objectManager = \Magento\TestFramework\Helper\Bootstrap::getObjectManager();

/** @var $product \Magento\Catalog\Model\Product */
$product = $objectManager->create('Magento\Catalog\Model\Product');
$product
    ->setId(1)
    ->setTypeId(\Magento\Catalog\Model\Product\Type::TYPE_SIMPLE)
    ->setAttributeSetId(4)
    ->setWebsiteIds([1])
    ->setName('Simple Product 1')
    ->setSku('simple1')
    ->setPrice(10)
    ->setData('news_from_date', $yesterday->format('Y-m-d H:i:s'))
    ->setData('news_to_date', $tomorrow->format('Y-m-d H:i:s'))
    ->setDescription('Description')
    ->setVisibility(\Magento\Catalog\Model\Product\Visibility::VISIBILITY_BOTH)
    ->setStatus(\Magento\Catalog\Model\Product\Attribute\Source\Status::STATUS_ENABLED)
    ->setCategoryIds([2])
    ->setStockData(['use_config_manage_stock' => 1, 'qty' => 100, 'is_qty_decimal' => 0, 'is_in_stock' => 1])
    ->setUrlKey('url-key')
    ->save();

/** @var $product \Magento\Catalog\Model\Product */
$product = $objectManager->create('Magento\Catalog\Model\Product');
$product
    ->setId(2)
    ->setTypeId(\Magento\Catalog\Model\Product\Type::TYPE_SIMPLE)
    ->setAttributeSetId(4)
    ->setWebsiteIds([1])
    ->setName('Simple Product 2')
    ->setSku('simple2')
    ->setPrice(10)
    ->setData('news_from_date', null)
    ->setData('news_to_date', null)
    ->setDescription('Description')
    ->setVisibility(\Magento\Catalog\Model\Product\Visibility::VISIBILITY_BOTH)
    ->setStatus(\Magento\Catalog\Model\Product\Attribute\Source\Status::STATUS_ENABLED)
    ->setCategoryIds([2])
    ->setStockData(['use_config_manage_stock' => 1, 'qty' => 100, 'is_qty_decimal' => 0, 'is_in_stock' => 1])
    ->setUrlKey('url-key2')
    ->save();
The Integration Test presented above is for testing a new functionality which allows to set the display mode of a category to "New Products". If set, the category will show new products only instead of those which are assigned to the category.
How Integration Tests work internally
Integration Tests use a separate Magento installation on a seperate database for testing. It is installed automatically, using the codebase of your project including all activated modules. All setup scripts are executed before the first test is performed. This takes about a minute and can be skipped under certain circumstances, see below.For each single test, all code is executed inside a database transaction which is rolled back after that so the database will be back in the original state. This allows for full encapsulation, I haven't recognized any side effects so far.
Set Up Integration Tests for Magento 2
There are a few simple steps to do before you can run your first integration test:1. Create a new empty database, i.e. "magento_integration_tests" or "<projectname>_integration_tests".
2. Copy the file dev/tests/integration/etc/install-config-mysql.php.dist to dev/tests/integration/etc/install-config-mysql.php and adjust the access data to your newly created database. Attention: don't change the backend-frontname setting!
<?phpreturn [ 'db-host' => 'localhost', 'db-user' => 'root', 'db-password' => '', 'db-name' => 'magento2_project_integration_tests', 'db-prefix' => '', 'backend-frontname' => 'backend', 'admin-user' => \Magento\TestFramework\Bootstrap::ADMIN_NAME, 'admin-password' => \Magento\TestFramework\Bootstrap::ADMIN_PASSWORD, 'admin-email' => \Magento\TestFramework\Bootstrap::ADMIN_EMAIL, 'admin-firstname' => \Magento\TestFramework\Bootstrap::ADMIN_FIRSTNAME, 'admin-lastname' => \Magento\TestFramework\Bootstrap::ADMIN_LASTNAME, ];
3. Copy the file dev/tests/integration/phpunit.xml.dist to dev/tests/integration/phpunit.xml. If you don't adjust the file after that, you'll be running the Magento 2 core testsuite which will take a few hours. Change the part inside <testsuites>...</testsuites>
    <!-- Test suites definition -->
    <testsuites>
        <!-- Memory tests run first to prevent influence of other tests on accuracy of memory measurements -->
        <!--<testsuite name="Memory Usage Tests">
            <file>testsuite/Magento/MemoryUsageTest.php</file>
        </testsuite>-->
        <!--<testsuite name="Magento Integration Tests">
            <directory suffix="Test.php">testsuite</directory>
            <exclude>testsuite/Magento/MemoryUsageTest.php</exclude>
        </testsuite>-->
        <testsuite name="IntegerNet">
            <directory suffix="Test.php">../../../app/code/IntegerNet/*/Test/Integration</directory>
        </testsuite>
    </testsuites>
With this change, you tell PHPUnit to test only those files which match the pattern /app/code/IntegerNet//Test/Integration//*Test.php, for example app/code/IntegerNet/CategoryDisplay/Test/Integration/Controller/NewProductsCategoryTest.php. Please adjust the pattern to your own Namespace(s).
4.Run the Magento 2 command line tool with the following parameters:
$ bin/magento dev:tests:run integration
You'll see the output as follow:
$ bin/magento dev:tests:run integration

---- /var/www/projectname/dev/tests/integration> php /var/www/projectname/./vendor/phpunit/phpunit/phpunit

PHPUnit 4.1.0 by Sebastian Bergmann.

Configuration read from /var/www/projectname/dev/tests/integration/phpunit.xml


Time: 31.87 seconds, Memory: 74.00MB

OK (2 tests, 6 assertions)

=== Memory Usage System Stats ===
Memory usage (OS):    105.78M (146.92% of 72.00M reported by PHP)
Estimated memory leak:    33.78M (31.94% of used memory)
Use the IDE for executing Tests
I like to use PhpStorm to execute the tests. The usability is better than on the command line, and I don't have to switch tools. Plus, here I have the possibility to easily use a debugger on the integration tests.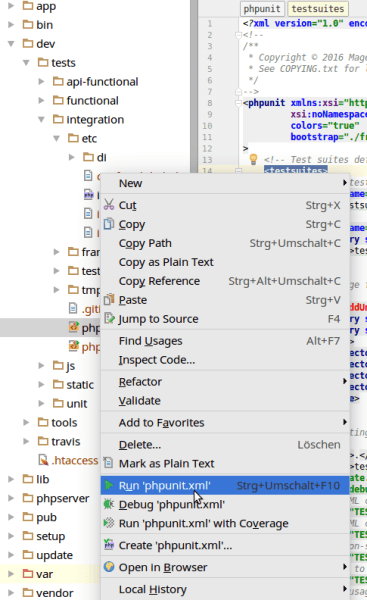
If you do it for the first time, there will be two settings which have to be made:
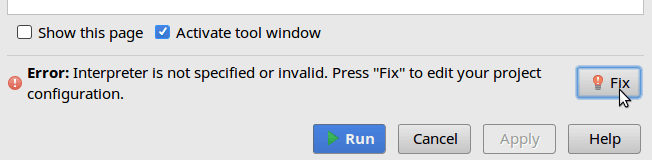
Just select the correct PHP interpreter (at least PHP 5.6) for the integration tests.
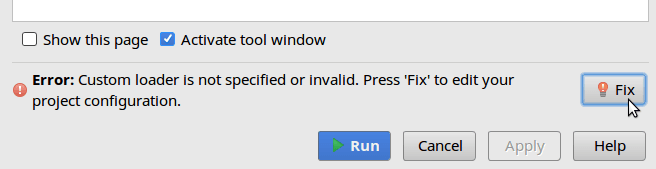
Fix this by setting the custom loader as follows:
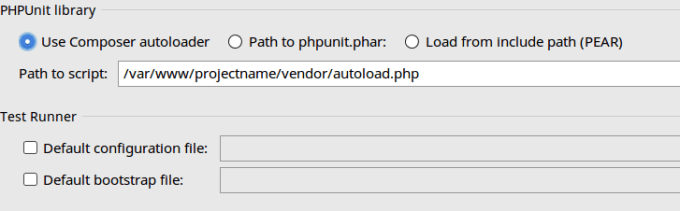
As a PHPUnit executable comes with Magento 2, you won't have to install any additional tools.
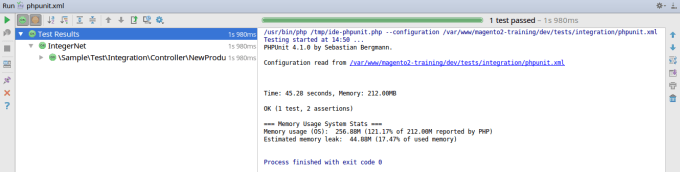
Now the testsuite is being run:
Running a single Test Class
If you don't want to run the whole testsuite but a single file instead, it's possible with PhpStorm too. Click right on the file in the tree and choose "Run":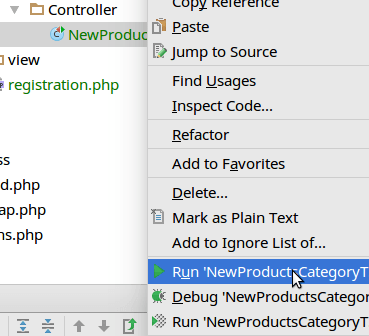
The test will fail at first try because the configuration isn't correct yet. You can now adjust the configuration in the top PhpStorm toolbar:
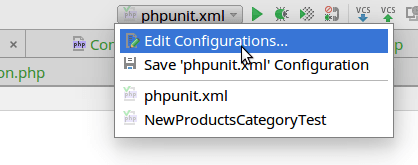
Now, set the alternative configuration file to your phpunit.xml:

If you click "Run" now, your integration test will be executed.
What I like about Magento 2 Integration Tests
I don't come from a testing background. I tried to do integration and unit tests in Magento 1 using the EcomDev_PhpUnit framework, I even got a training by Ivan Chepurnyi, who created it, himself. Still, I found writing those tests very hard, and tests took me much more time than the "real" development, so I abandoned it after a few months.I tried again with Magento 2, and it is much easier and much more reliable now.
I have chosen Integration Tests as my preferred testing method in Magento 2 for the following reasons:
- They are, in my opinion, the simplest to implement.
- They test how the written code interacts with Magento and with the other modules. It is less dependant on assumptions of the developer which may be wrong or incomplete.
- They can be written using pure PHP.
- I can use Xdebug as a debugger if something goes wrong.
The biggest advantages compared to integration tests in Magento 1 are:
- Especially creating fixtures (predefined database contents, like customers, products, categories, configuration settings...) is much faster and much more reliable (instead of hard-to-debug YAML files which have been used in EcomDev_PhpUnit). You can copy a lot of those from the core testsuite (dev/tests/integration/testsuite).
- The tests are well encapsulated, so one test doesn't affect the next tests. This was one of the biggest problems in EcomDev_PhpUnit.
- In many cases, Mocks or Stubs are not needed. You can still use them if you want / need to.
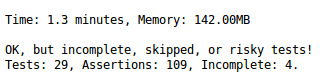
- Executing them takes some time as the database is involved. This is a screenshot of the testsuite in one of our current projects:
You can only test the PHP part, but no functions which use JavaScript for example.
A few tips
1. If you want to speed up the initialization time, you can set the variable TESTS_CLEANUP inside the phpunit.xml to "disabled" instead of "enabled". This will skip recreating the Magento installation on every test run. Be careful though: If you added a new module or added a new setup version, it may be necessary to enable the TESTS_CLEANUP temporarily in order to force reinstalling Magento on the test database. Do that if you get errors which you can't explain.2. Depending on your task, you can use Controller Tests which include a call to a URL, as in the example above. Instead of the GET request, you can easily do a POST request as follows:
    /**
     * @magentoDbIsolation enabled
     * @magentoAppIsolation enabled
     */
    public function testPostRedirectOnSuccess()
    {
        $postData = [
            'name' => 'Dummy Name',
            'comment' => 'Dummy Comment',
            'email' => 'invalid@invalid.com',
            'hideit' => '',
        ];
        $this->getRequest()->setPostValue($postData);
    $this->dispatch('contact/index/post');
    $this->assertTrue($this->getResponse()->isRedirect(), 'Response should be redirect');
    $this->assertRedirect($this->stringContains('contact/index/success'));
    $this->assertSessionMessages($this->equalTo([(string)__('Thanks for contacting us with your comments and questions. We\'ll respond to you very soon.')]), MessageInterface::TYPE_SUCCESS);
}
The example also shows how to test for redirects and success or error messages.3. You can test the behavior for logged in customers with this code:
        /** @var \Magento\Customer\Model\Session $magentoCustomerSession */
        $magentoCustomerSession = $this->objectManager
            ->get(\Magento\Customer\Model\Session::class);
        $magentoCustomerSession->loginById(1);
Make sure you have a customer with the ID 1 defined in your fixtures.4. You can find many examples of integration tests in dev/tests/integration/testsuite.
5. It is okay (and recommended) to use the object manager in integration tests.
Background: Types of Automated Tests
There are mainly three types of automated tests:Unit Tests
- Used to test code blocks like single methods.
- Written in PHP with the well known testing framework PHPUnit.
- Called without access to the database.
Integration Tests
- Testing the behavior of user stories, i.e. if a customer can log in.
- They test whether a module works well together with other modules.
- Written in PHP, using PHPUnit as a testing framework too.
- Using a testing database - it's more or less a clean parallel installation of Magento 2 which gets installed automatically.
Functional Tests
- They use a dummy browser to test the whole functionality of the shop, for example from home page to checkout.
- They typically use Selenium as a testing framework.
- They are run on a working Magento 2 installation. They can even be executed on the live shop with live data in order to test crucial functionalities like checkout and report if any errors occur.